After much dithering, I've broken down and bought some server space for a website. I'm moving the blog to the new site, and I'll be able to put up files for projects as well. The new blog is at http://www.velociengineer.net/.
This gives me even more incentive to keep the blog updated, so with luck you'll see more activity as I prepare things for Bayou Wars.
Sunday, March 4, 2012
Sunday, February 5, 2012
Ship bases: group photos
Next in the queue, marines from Pulp Figures. I'll post next Sunday with what progress I've made.
Sunday, January 29, 2012
Ship bases: painting
I trimmed up the edges of the bases with a knife, then started painting. Pick a base color and several highlights. I started with a bright blue, covering the texturing on the base top. Also paint the plastic along the edges of the texturing, to make sure none of the white base shows next to the ship.
The first highlight was a heavy drybrush of Ceramcoat's Ocean Reef Blue. I hit every surface, only leaving the original blue visible in the deepest troughs and crevases.
Folk Art's Light Blue is next. I hit all the high points with this to pick them out from the surface.
Last, I used white on the tops of the waves and the churn at the back, places where the water would foam up.
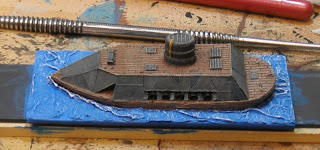
When finished, the ship should just fit in its place in the texturing. A couple dots of superglue hold it tight.
And that's it. Once I get the rest of the bases done (and pick up the ships I left at Jay's place after showing them off at last week's game :/ ) I'll put up a group shot.
Sunday, January 22, 2012
Ship Bases
I wanted some nice bases for the Uncharted Seas ships I painted up. Like everything else I do, I looked for a method I could steal rather than trying to figure it out for myself. While poking around, I found some very nicely done ships on the Lead Adventure forums, and a (very) brief description of how the bases were made. Here I show how I copied the idea.
First, materials. You'll need something to serve as the base; I used 0.040" styrene sheet because I had it, but you could use any material you can cut to size and won't warp when glue is applied. You'll also need white (PVA) glue and toilet tissue, torn or cut into small pieces. I used a sculpting tool and a pair of tweezers to apply the glue and tissue to the base, but anything convenient should work.
Naturally, you need a ship to base. I wanted about 5mm of exposed base around the ship, so I added 10mm to the length and width of the model; for this ship, that came out to 33mm x 77mm. I cut a piece of styrene to size and lightly tacked the ship in place with a few dots of white glue. You will remove the ship later, so don't do anything permanent here. The lines are 5mm from the edges, and are just guides I used to ensure I had the ship centered and straight.
(Here I've tinted my glue blue so it is visible; white base, white glue and white paper do not make for good photography.) Spread a thin layer of neat PVA glue on the base, being careful to keep it off the ship. Start placing pieces of tissue on the glue, using your tools to tuck it down on the base until it sticks in place. Don't worry if it overhangs the edge, you can trim it up with a sharp knife once the glue dries.
Once the tissue has been stuck in place, put a thick layer of glue on top of it. This will quickly soak the tissue through and break up the fibers in it.
Using a sculpting tool of some sort, push the tissue and glue into a wake shape drawing off from the edges of the ship. Start at the back of the ship, and push the tissue toward the back to raise up the waves. If you keep the edge of the tool at the bottom of the wave, the top of the wave should angle forward like it's crashing over.
At the bow of the ship, push the "water" up against the hull so it is rolling off and forward, and extend the wave off the edge of the base to the side. Then do the same for the other side of the ship.
Give it a few hours to dry, then carefully remove the ship from the base. If you got too much glue on the ship and wait too long to remove it, part of the sculpted water may come up from the base. Just add a bit of glue under the part that came loose and hold the water in place as you remove the ship.
Once it has dried thoroughly, I'll paint it. I'll show how that goes in my next post.
Subscribe to:
Comments (Atom)


